This article first appeared on the The Rented Spade. Thanks to Kath and Nic for allowing me to use it!
Chinook hops. Photo by Nic Johnson
I’ve written this article much like the hop grows, heading in a general direction with some meandering off shoots.
Hops (humulus lupulus) are a perennial plant that shoots in spring, flowers in summer/autumn and dies off in winter. Different varieties will flower at different times, this allows you to plan brew days around the different harvests, handy really.
Growing
Not all hops grow well in the same environment, so check the interweb for a variety that will suit your location. They do like long summer days, can tolerate the heat, and love the rain or watering can. Don’t ever let your hops dry out, so test the soil with your finger to check for wetness. Saying this, it was suggested to me to water the plants every second day as opposed to daily. This prevents the roots getting waterlogged and allows good air flow around the roots. If the new growth is turning a yellowish colour, you may be giving it too much water.
A hop bine is a climbing plant that grows in a helix around a central support. This is opposed to a vine which has tendrils or suckers. Almost all varieties grow twisting around the cord in a clockwise direction (looking down the cord with bine coming at you). I use a hardy nylon cord about 5 mm in diameter to support my plants such as tent rope designed for outside use. Get something that can support some weight, withstand direct sun and that won’t rot. Hops can grow upwards of 7 meters so run your cord to a high point, for example the apex of your roof, a high branch or at least to the top of a high fence.
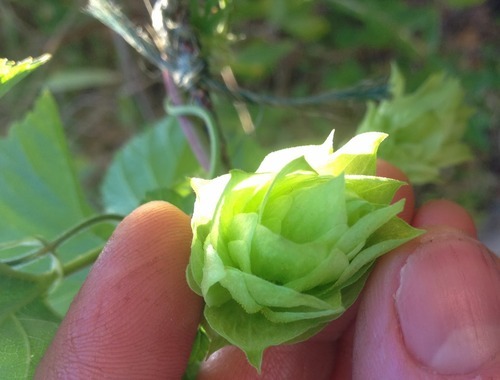
Chinook hop. Photo by Nic Johnson
Planting and Position
Hops can become a pernicious weed if left to grow wild in the ground. The hop plant has a rhizome for its root stock and spreads out the same way as bamboo, ginger or asparagus. These roots can grow out to several meters on a second season plant.
Hops can do quite well in large pots, 50 cm diameter or larger is recommended and tall pots work better than short pots. Pots are great as you can buy in potting mix perfectly suited to the hops without having to build up your garden soil. Growing in the ground will give you greater yields but you will have to control the spreading of the plant and compete with weeds.
Hops go well in soils that vegies would also thrive in. They like manures, particularly cow manure. If using chicken manure go easy with it, this shit burns. If you have a ph meter, hops do best in soils between 6 and 7.2 ph. Blood and bone is a good slow release fertilizer, but try and get the one with potassium added or add 1 part potassium sulphate with 10 parts blood and bone. I just use Ozmocote organic fertilizer designed for vegies that has minerals galore. Put some straw or mulch on the surface of the soil to prevent evaporation in summer. Do not use Dynamic Lifter as it is too alkaline for hop plants.
When planting the hop rhizome, place it on the surface of the pot or ground, roots down and make a mound on top of it. The roots need good air circulation especially in the early days. When the plant has started sending up the shoots to about one foot you can fill in the earth around the mound and have the surface of the soil at one level. Take care handling and planting hop rhizomes as they are quite easy to damage.
Pests
As for pests and other annoyances I have been lucky enough to not have any issues. There is the spider mite that hides under the leaves and can be seen using a jeweler’s loupe (magnifying glass). They will breed best in hot dry conditions so be vigilant around these times. These can be dealt with using predatory mites or a concentrated pure neem oil extract at 5 ml per liter of water. If weird things are going on take photos and show them to your local nursery horticulturalist.
Harvesting
You will only harvest a small amount in your first season, the plant is spending most of its energy establishing its rootstock. Cascade gives the best first year yield compared to other varieties.
The little yellow lupulin glands are responsible for all the hops aroma and bittering powers. They are located at the base of the flower petal and will be sticky to touch. When the hop flower, or cone, is ready to pick, it will smell pungent with aromas particular to its variety rather than smelling grassy. The cone will begin drying out and the edges will start to brown. When pressed the cone will sound papery and spring back to its original shape. If the cone stays compressed after squeezing, it is not ready to pick. Hop bines have little spiky hooks all over them so wearing gloves while harvesting is recommended. These spikes can cause irritation to some people.
The hop cones on your plant may be ready at different times so pick them as you see fit. I pick in a couple of stages, leaving the newer flowers on the plant until they appear to be drying out. To dry them fully, space out the cones on a stretched piece of fly screen or fly screen door so air can move freely around them. Have a fan blowing gently on them for a couple of days, three should do it if the days are hot. When the pedals come away easily from the stalk they are dry enough to store. Heat and oxygen are the enemies when it comes to degrading your hops. Keep them in a sealed vessel with the air squeezed out or even better, purged with C02 and stick them in the freezer.
When the plant dies off in winter, cut it back at ground level and mulch the soil in preparation for its winter nap.